5. Below Grade or Partial In Grade Installations No Cabinet
5. Below Grade or Partial In Grade Installations No Cabinet
5.1 Backfilling Exclusion Hydropool will void any warranty of swim spas that are back-filled. | ||||
5.2 Excavation Call before you dig! Please make sure you have any permits in place that are required from your municipality. | ||||
5.3 Vault/Bunker Specifications When recessing the swim spa all or part way below ground level, a concrete base along with a concrete retaining wall to hold back the earth is required. This forms a Vault or 'bunker, in which the swim spa is placed. | ||||
5.4 Base of Support It is necessary that a concrete base be poured level and reinforced in order to support the swim spa. In addition, if you are in an area that experiences freezing and thawing concrete footings should be added as outlined in section 4 of this guide. | ||||
5.5 Crawl Space It is recommended leaving a 24 in. (61 cm) wide crawl-space around the entire unit to ensure adequate accessibility on the all sides for service access. At the Equipment end it is recommended to have a 3 ft. /90 cm crawl space for work space. | ||||
5.6 Ground Water The Vault will be the lowest part of your backyard and therefore good drainage is essential. A properly designed drain system and sump pump complete with a float switch should be constructed as part of the crib and should be located at the equipment end of the Swim Spa. This should prevent flood damage from ground water that may enter the crib. | ||||
SAMPLE Top View Inground | End View Full Inground | End View Partial Inground | Side View Inground | ||||
5.7 Service Access Future service must be considered at the time of design and installation. You must be able to access all sides and areas of your swim spa. Difficult access will result in supplemental service labour charges not covered by the factory warranty. Consider easily removable deck materials. | ||||
5.8 Water Test During shipping and handling some of the components may have shifted. Please ensure the swim spa is tested for 48 hours before you prepare the installation of the surrounding/finish deck around your swim spa. Even though all units are tested in our plant, some transport/site handling damage may occur and we suggest you make sure the swim spa is perfectly waterproof before finalizing your installation. | ||||
5.9 Overall Support Your Hydropool Swim Spa is equipped with a factory installed load support substructure, which distributes the weight of the water over the entire footprint area of the swim spa. The supporting floor must be even and level. Although the lip of the swim spa must be supported to ensure it remains level, NEVER SUSPEND a swim spa from a deck or floor by the outer acrylic edge, as this will lead to product damage and/or serious personal injury. | ||||
5.10 Insulation It is important to create a well-insulated vault when installing a swimspa in ground. This can be done a couple of ways: 1) Use insulated concrete forms when pouring the walls of the vault. This will accomplish two things, one it will provide the wall support needed to build a deck and two it will give the insulation required to keep the running costs to a minimum 2) After installing the concrete block for the walls of the vault, add Styrofoam Blue insulation or Thermal Shield blanket to the interior walls to create well insulated area 3) Finally purchasing a Polartec Insulated Mat or a thermal shield blanket, which can be placed on the concrete pad before the swim spa is placed. This will allow you to create a fully insulated vault area. Installing styrofoam insulation for the swim spa to sit on will void warranty! | ||||
5.11 Set Up and Assembly Set-up of your swim spa will vary depending on whether you have purchased an AquaSport or Aqua Trainer model. Once your swim spa is set into place, you are ready to install the steel support legs and connect the equipment package. | ||||
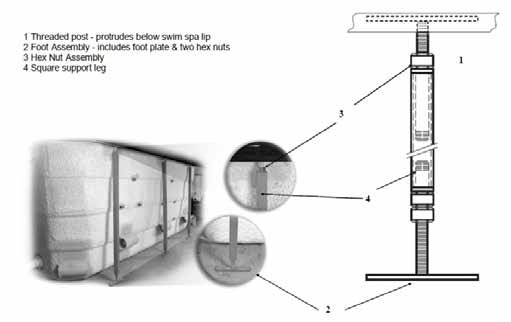
5.12 Equipment Protection The equipment must be located in an area where it will remain dry and will not be exposed to rain, snow or ground water. When your swim spa is to be installed above ground, the factory cabinet is designed for both protection, insulation and accessibility. When your swim spa is to be installed fully or partially in the ground, or if you have ordered a swim spa without a cabinet: it is necessary that the equipment be installed in an area that is dry, protected from the elements, has proper ventilation, and is easily accessible for service. Steel Support Leg Assembly Finger tighten the steel support legs before adding water to the swim spa. Do not adjust the steel support legs until water is added to the swim spa. 1 Threaded post-protrudes below swim spa lip 2 Foot Assembly - includes foot plate & two hex nuts 3 Hex Nut Assembly 4 Square support leg
| ||||
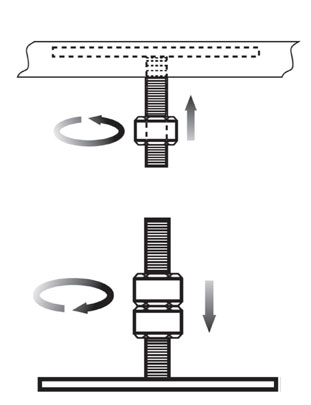
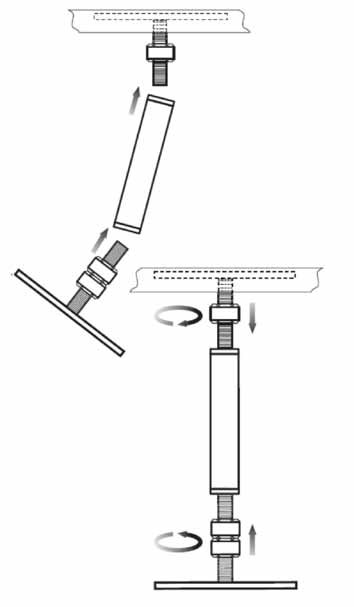
5.13 Set-Up & Assembly 1) Thread one hex nut all the way up to the top of the threaded posts attached under the lip. 2) Thread two hex nuts down to within 2.5 cm (1 in.) of bottom of foot plate. 3) Slide the foot plate assembly onto one end of the square support leg, then slide the leg onto the threaded post under the swim spa lip. 4) Bring the two hex nuts on the foot plate up about 5.1 cm (2in.) and the hex nut on the threaded post under the swim spa lip, down about 5.1 cm (2 in.). Finger tighten until the leg is secure. Loosen the hex nuts on the horizontal rod so that the leg is level and tighten until the leg is secure.
5) After the swim spa is filled with water, the legs can now be adjusted as necessary from either the top or bottom with a wrench to ensure that the walls are straight and level. While the swim spa is filling, it may be necessary to adjust the steel support legs while filling with water. Should the unit bow outward, lengthen the steel support leg by turning the top nut Counter clockwise on the bottom foot. Should the shell bow inward, shorten the steel support leg by turning the top nut clockwise. Be careful to only adjust the nut 1/4 or 1/2 a turn at any one time. Do not extend the leg length too much as this may cause deformation on the top flange. Adjustments may be necessary on more than one leg. |
| |||